| Axys (Red Sail Technologies) | 
|
| Central Reach (ABA software) | 
|
| Clinicient |  |
| ComputerRx | 
|
| FrameworkLTC |
|
| Liberty Software |  |
| PioneerRx |  |
| PointClickCare |
|
| QS/1 Primecare |  |
| Rx30 | 
|
| SuiteRx |  |
- Don't see your software listed? Contact us to provide you instructions.
- Looking to change / switch your practice software?
- If you're onboarding and doing a test upload, we will not mail out anything.
🏥 Agency (Facility) Billing: to send multiple patient invoices in one envelope (or email) to an Agency (Facility), learn more here.
Axys (from Red Sail Technologies)
Summary:
Step 1: Preview. First check and confirm all invoices are accurate. Make any corrections needed. You can check one invoice at a time. (If your process does not require this step, then skip to Step 2.)
Step 2: Generate. Then, generate all invoices to a CSV file, and all statements to a second CSV file. (This must be done once for all invoices. Do not generate individual invoices.)
Step 3. Download the 2 CSV files from Axys.
Step 3: Upload the 2 CSV files to AR Proactive
Step 1. Confirm all patient invoices are accurate (preview) and make any corrections
- Open the mega menu (the ladder icon
 at the top right)
 - Click Billing Tasks (in the Financial section)

- On the Billing Tasks tab, Filter for Description "Create invoice"
- Select each invoice one by one.
- Click "Open". (DO NOT click Generate. Clicking generate will not allow you to go back to make any corrections. It will also generate an individual CSV file.)

- On the Billing Details tab, review accuracy of line items, make any corrections, then click "Close" (or Ctrl+Q)
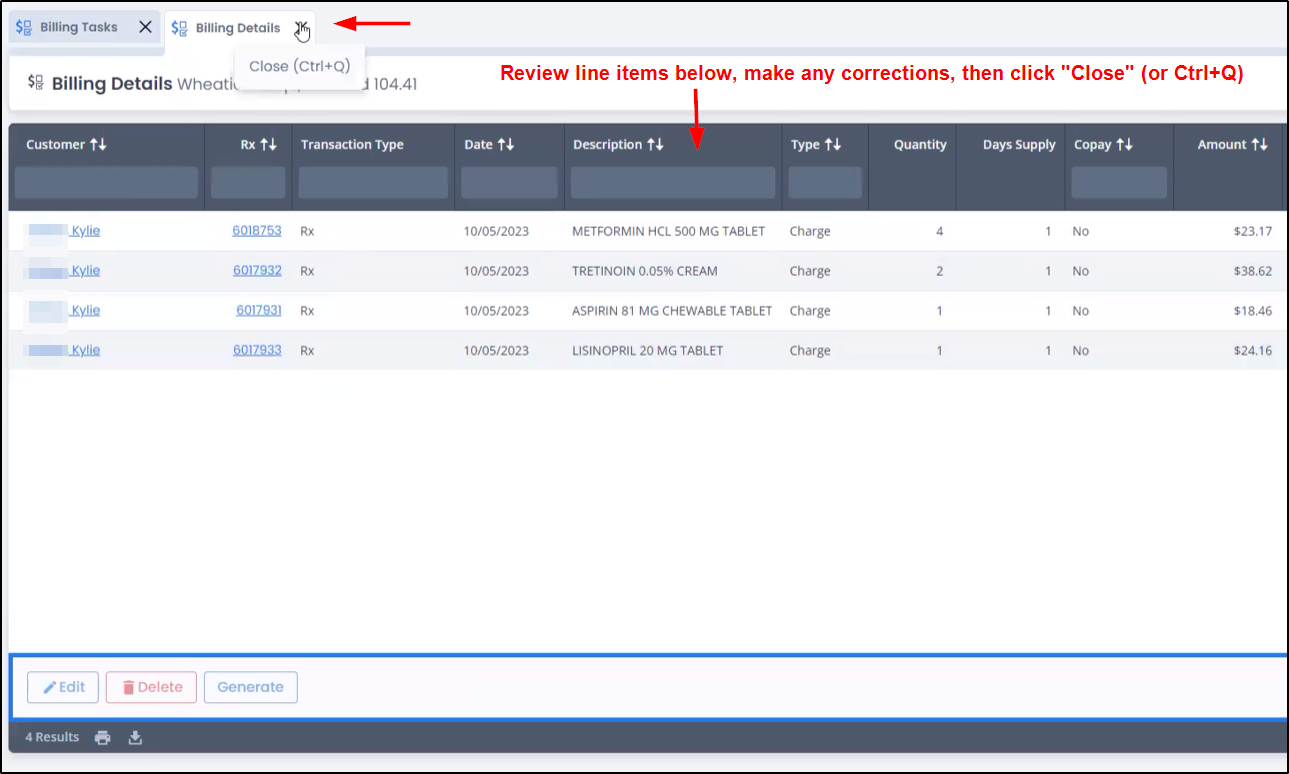
- Repeat this for all invoices. (If your process does not require this step, then skip to Step 2.)
Step 2. Generate the patient invoices
- Open the mega menu (the ladder icon at the top right)
- Click Billing Tasks (in the Financial section)

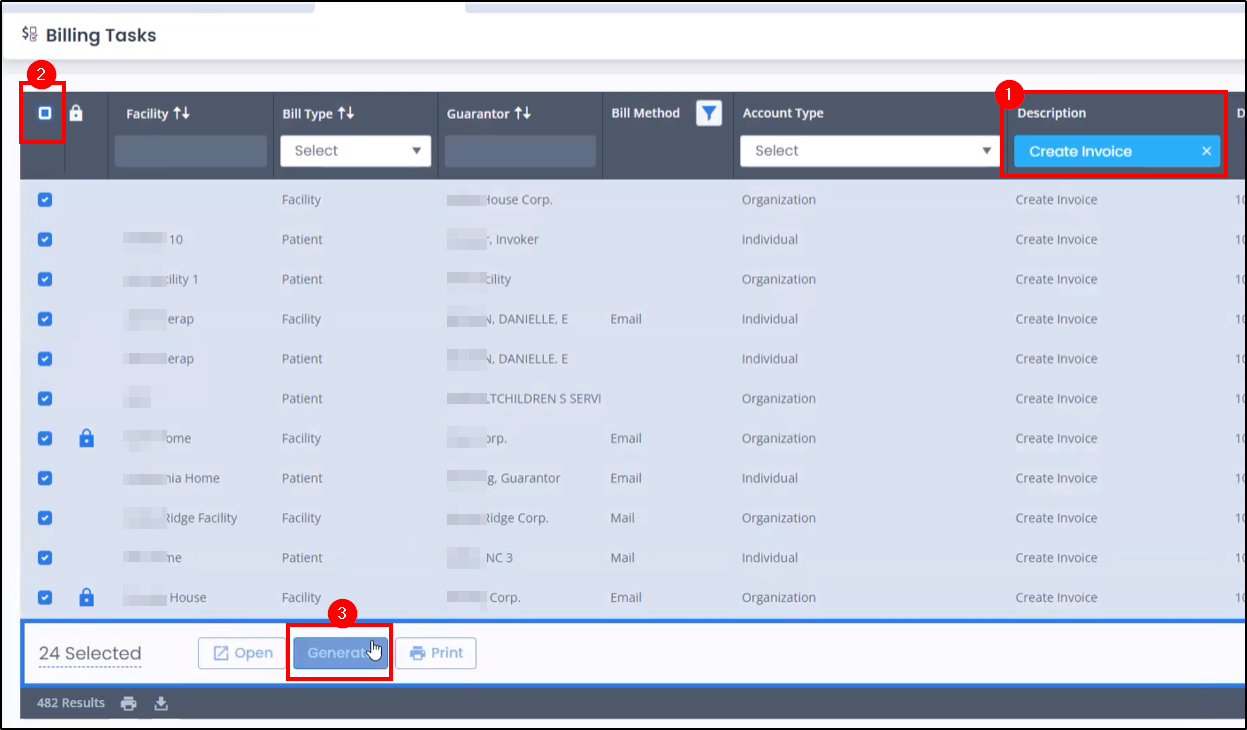
- On the Billing Tasks tab, Filter for Description "Create invoice"
- Select all invoices. You can click the checkbox in the header row, to select all invoice checkboxes.
- Click Generate. This will generate one CSV file for all invoices. This will happen in the background. (Generate cannot be undone. So make sure to do Step 1. Preview first.)
- Repeat the same steps for "Generate Statements". (This is for patients with a past due balance.) Filter for Description "Generate Statements"
- Select all invoices. You can click the checkbox in the header row, to select all invoice checkboxes.
- Click Generate.
- Click Print. This will generate one CSV file for all statements. This will happen in the background. (Generate cannot be undone. So make sure to do Step 1. Preview first.)

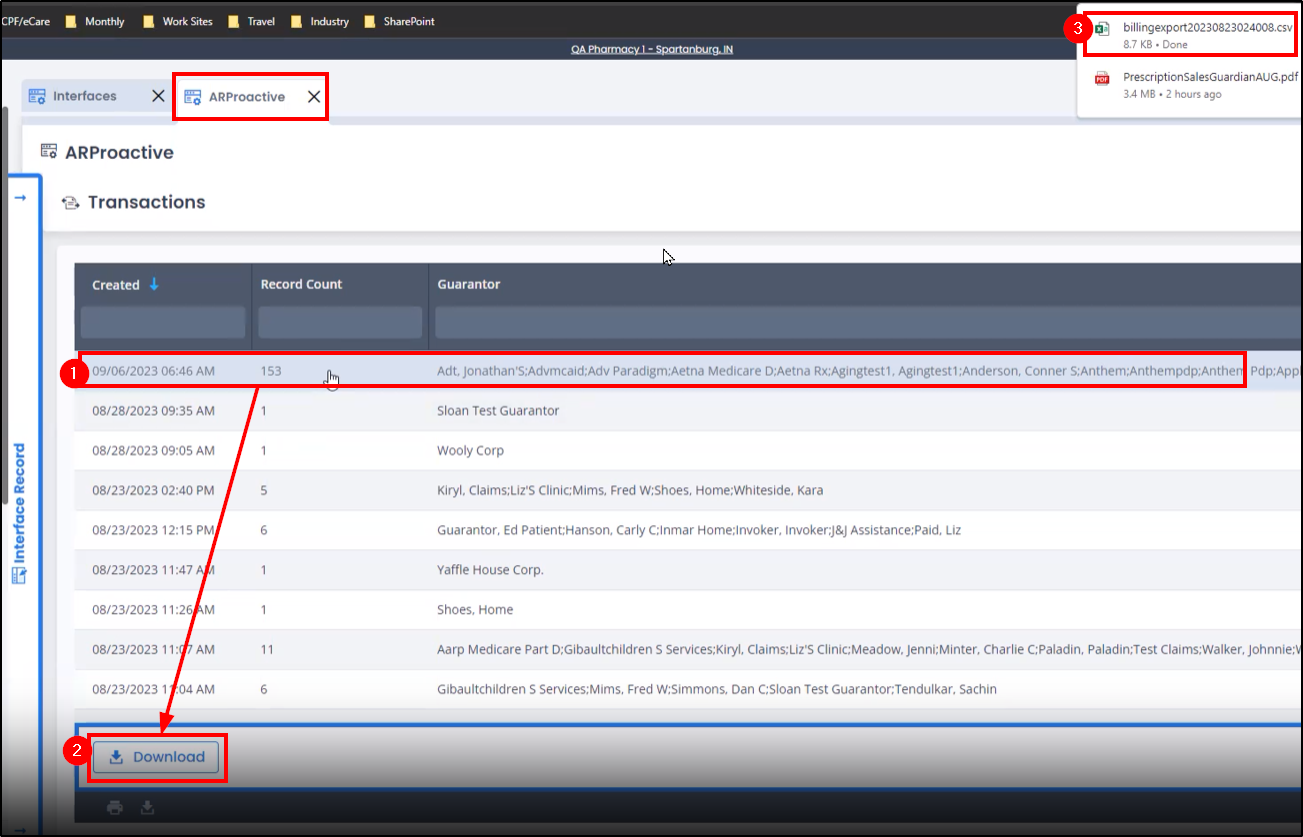
Step 3. Download from Axys
- Open the mega menu (the ladder icon at the top right)
- Click Interfaces (in the Administration section)
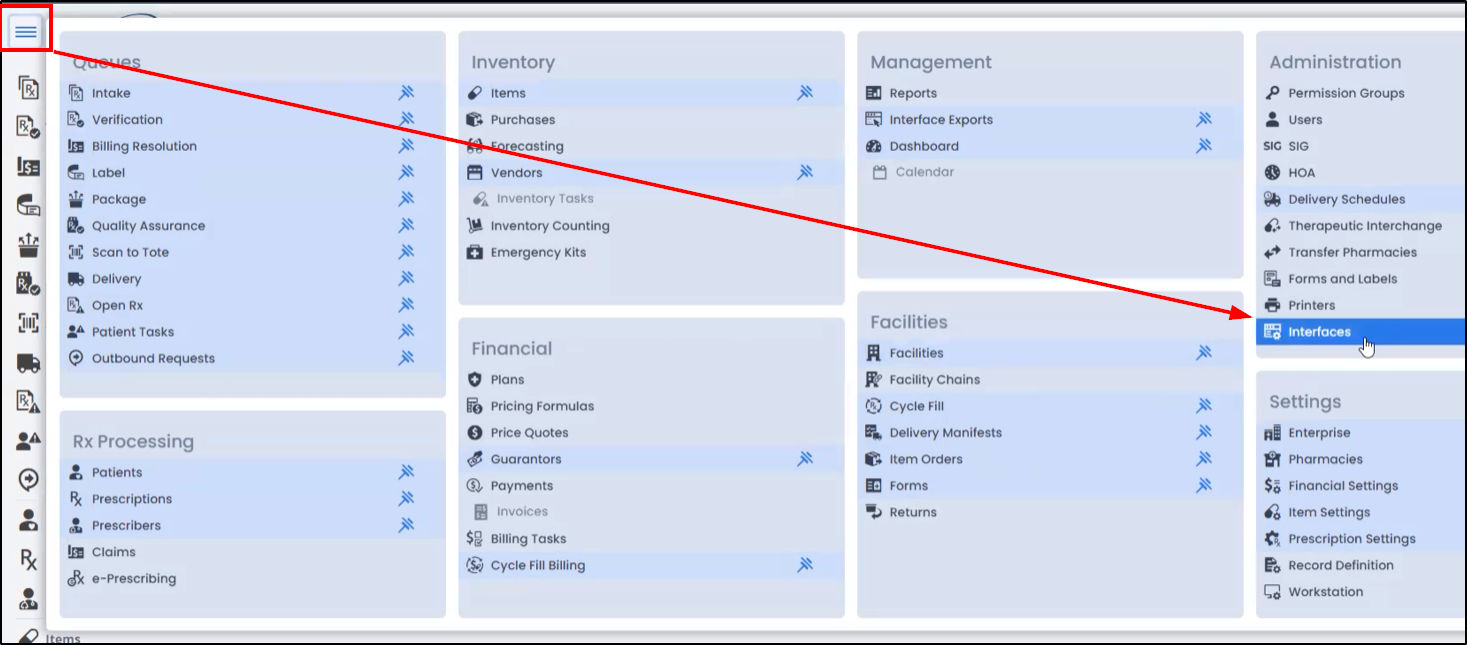
- Look for Description is "AR Proactive"
- Click AR Proactive
- Click Transactions button at the far right
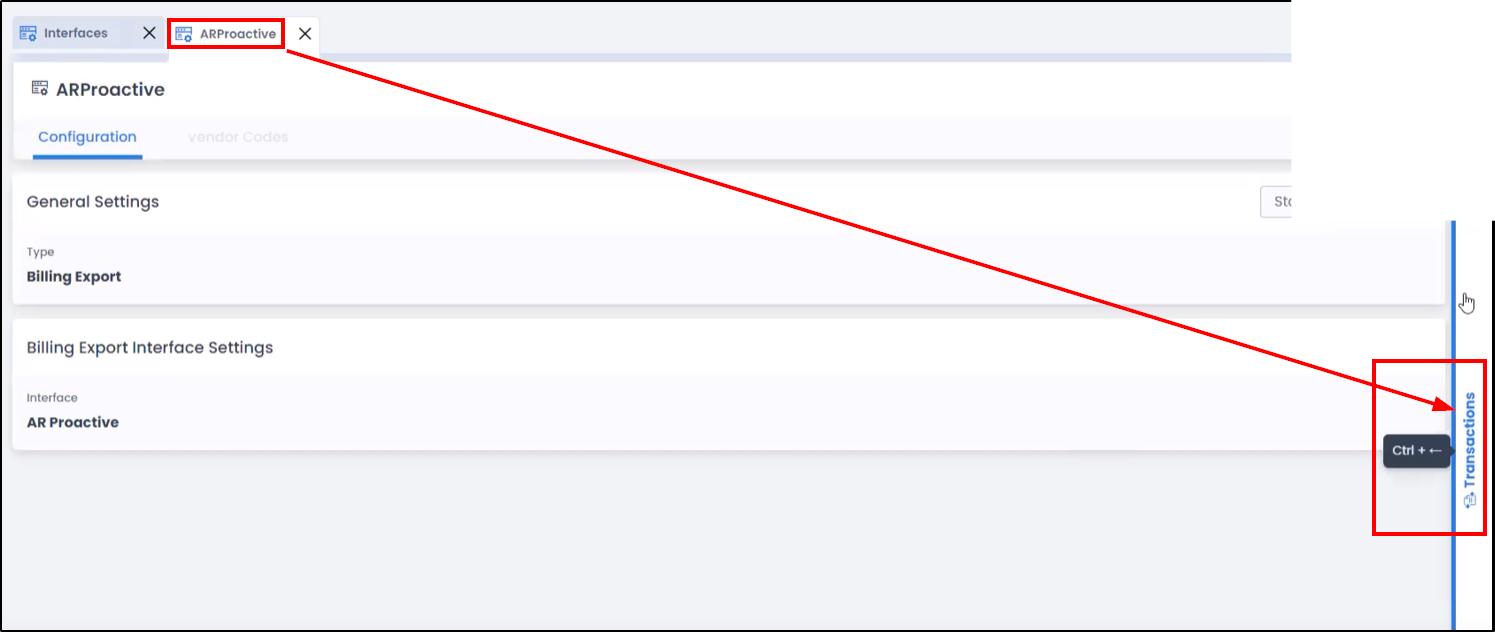
- Select the most recent transactions (generated from Step 2 above). There will likely be 2 transaction (and therefore 2 downloads)
- Invoices (current charges)
- Statements (past due charges)
- Click Download
- The CSV (.csv) files will download to your browser's default Download folder.
Step 4. Upload to AR Proactive
- Go to ARproactive.com > Login > Patient Billing > Uploads > click Create a job
- Click Choose File for both the Invoice and Statement file, and navigate to the folder location. There must be only one Invoice file (and one Statement file, if any patients have past due charges.) See below what to do if you mistakenly generated multiple invoice CSV files.
- Click Upload files and start job
- You’re done! Our team will be automatically notified of you new upload.
⚠️ If you mistakenly generated multiple invoice CSV files:
- then you can ZIP the multiple invoice .csv files into one .zip file. To do this:
- Open Windows Explorer
- Navigate to your browser's Download folder
- Select the multiple CSV invoice files (they maybe appear with a Microsoft Excel icon)
- Right click and chose "Compress to ZIP file"
- Upload the newly created ZIP file (containing the multiple invoices) to us, as in Step 4 above. On our side, we will manually merge the CSV invoice files into 1 file.
🚫 Exclusion list: if you want to exclude certain patients from being mailed/emailed (even though they appear in your billing file), do the following:
- download this Excel Exclusion List for Axys,
- enter the Guarantor ID's into the Exclusion List that we should not mail/email (i.e. ignore), and then
- upload the Exclusion list, along with your Invoice and Statement files each month. You will see 3 "Choose file" buttons.
CentralReach (ABA software)
Step 1. Run the Billing Export and Client Report
- Log in to CentralReach
- Run the Billing Export (as a CSV file)
- Run the Client Report (as a CSV file)
Step 2. Upload to AR Proactive
- Go to ARproactive.com > Login > Patient Billing > Uploads > click Create a job
- Click Choose File for both the Billing and Client Report, and navigate to the folder location.
- Click Upload files and start job
- You’re done! Our team will be automatically notified of you new upload.
Note:
- AR Proactive can send out invoices only to patients (not reminder letters), for CentralReach health providers.
- We cannot send invoices and reminder letters to patients. This is due to a known limitation in the way that CentralReach exports their patient statement data.
🚫 Exclusion list: if you want to exclude certain patients from being mailed/emailed (even though they appear in your billing file), do the following:
- download this Excel Exclusion List for CentralReach,
- enter the Client ID's into the Exclusion List that we should not mail/email (i.e. ignore), and then
- upload the Exclusion list, along with your Client and Billing files each month. You will see 3 "Choose file" buttons.
Clinicient
Step 1. Run the Statements report
- Open Clinicient
- Go to Print > Statement > Patient Statements (screenshots on the next page)
- It’s recommended to use the default settings (or else you can make changes in the Create Statements and Statement Settings tabs).
- click Save

- Set “Create Statements As Of” to yesterday’s date. For example, if today is 7/13/2021, set it to 7/12/2021. (This is so the statements capture the most recent activity)
- Click Preview to do any error checking
- Click Save to File and pick a folder you can access

Step 2. Upload to AR Proactive
- Go to ARproactive.com > Login > Patient Billing > Uploads > click Create a job
- Click Choose File, and navigate to the folder location.
- Click Upload files and start job
- You’re done! Our team will be automatically notified of you new upload.
ComputerRx
Step 1. Run the Statements report to get CSV files
- Go to: WinRx > Accounts > Audit information > Export Full Charge Data (DrugStoreCharge, VFI)
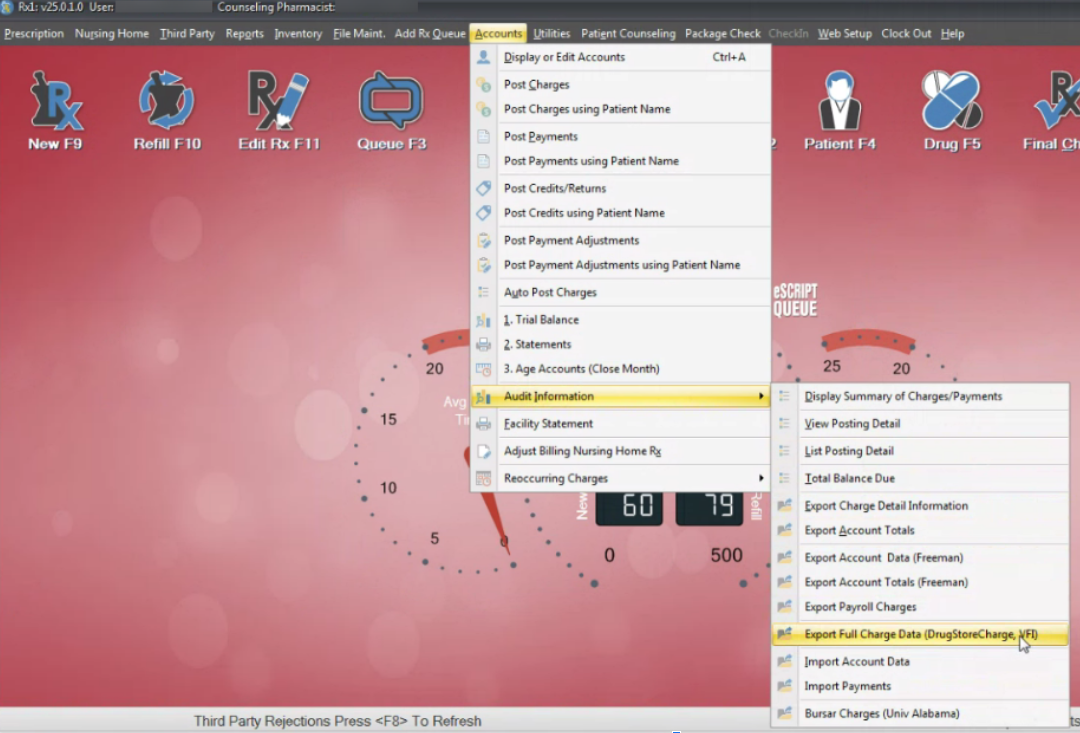
- Select “Starting date” to be 12 months in the past (to capture all dates of service that may be on this bill) > click Ok

- Click “Ok” to acknowledge that 4 CSV files were created in your Pharmacy folder. You’ll retrieve these files later in Step 2.
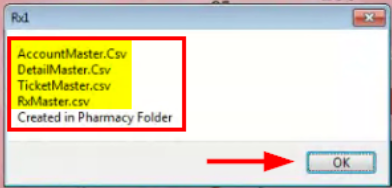
Step 2. Locate the files in the Pharmacy folder
- Usually, there is a desktop link called “Pharmacy Shortcut” to the pharmacy folder. (If you’re unsure, CompuerRx support can tell you where it is.)
- In the Pharmacy folder find the 4 CSV files. The files are called: AccountMaster.csv, DetailMaster.csv, RxMaster.csv, TicketMaster.csv.
- Sorting by date from most recent to oldest, will help.
- (You can ignore the PDF of patient bills that may have been generated, which is called Stmt-[yyyymmdd].PDF or similar.)

Tip: if you need to check the Balance (total amount owed) for a patient in the ComputerRx statement export, follow these steps:
Patient Balance =
"Bal Forward" (col F) in AccountMaster.csv
+
sum of "Charge Total" (col D) in DetailMaster.csv
+
If Service Chg (col K) in AccountMaster.csv = "Y" (i.e. yes)
and
If 30day 60day or 90day is populated (i.e. has amounts)
then
Add service charge of 1.50% (or whatever you've set in ComputerRx) with a minimum service charge of $0.50 (or whatever minimum you've set), if the patient balance is over $2.00 (or whatever minimum patient balance incurs a service charge)
Step 3. Upload the files to AR Proactive
- Go to ARproactive.com > Login > Patient Billing > Uploads > click Create a job
- Click Choose File, and navigate to the folder location of the patient statement file you exported above.
- If you need to exclude certain patients, click here to see how you can upload an Exclusion List.
- Click Upload files and start job
- You’re done! Our team will be automatically notified of you new upload.
🚫 Exclusion list: if you want to exclude certain patients from being mailed/emailed (even though they appear in your billing file), do the following:
- download this Excel Exclusion List for ComputerRx,
- enter the patient ID's into the Exclusion List that we should not mail/email (i.e. ignore), and then
- upload the Exclusion list, along with your Patient Statement file each month. You will see an extra "Choose file" buttons.
FrameworkLTC
Step 1. Run the Print Statements report
For NEW Framework customers: contact your Implementation Team at Softwriters to create billing for a test patient. Then you'll be able to follow the steps below.
For EXISTING Framework customers: follow the steps below.
- FrameworkLTC > Billing > Print Detailed Statements

- Select Pharmacy
- Select Create VFI Interface File to export to the VFI file format.
- Click Print.
- FYI: to review your statements before sending them to AR Proactive, you can "Print" statements as many times as you want to paper or PDF to review them internally. However, once you roll balances forward, you are no longer able to print the invoices.
- Remember the folder where you save the file.
- Just in case, FrameworkLTC support is (412) 492-9841.

Optional Tip: to make the statement report reflect payments received after the 1st of the month (to avoid “crossed in the mail”):
- Post all payments, including those received after the 1st of the month.
- Post charges with dates before the 1st of the month (but not after).
- Use today’s date as the Cutoff Date (i.e. 10th of the month), so that all recent payments are included, but only last month’s charges (since only those charges were entered).
(The Run Date is the billed date, and should be the last day of the month being billed, e.g. 5/31/22.)
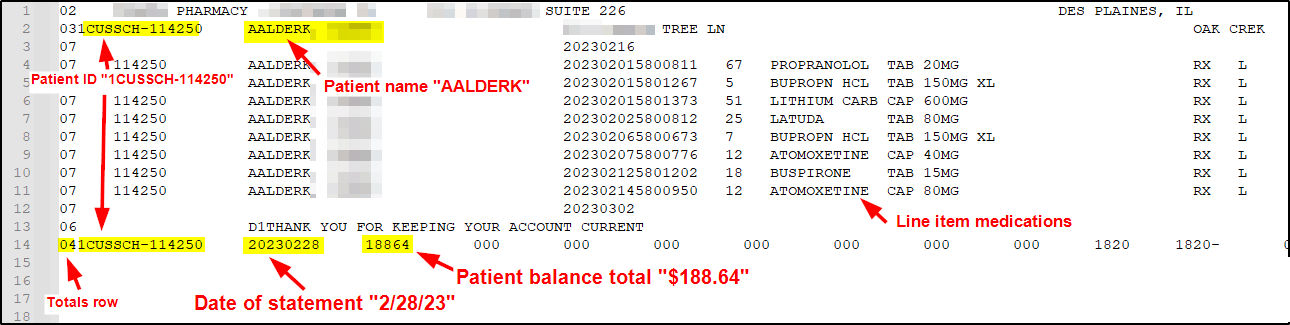
Tip: to see the Balance (total amount owed) for a patient in the FrameworkLTC statement export:
- Open the statement file in Notepad (Notepad++)
- Look for a line beginning with the characters "04" which indicates a totals row.
- Using the snippet below (right click > "Open image in new tab" to see it bigger), you can identify
- Patient ID
- Statement date
- Balance total for the patient
Step 2. Upload to AR Proactive
- Go to ARproactive.com > Login > Patient Billing > Uploads > click Create a job
- Click Choose File, and navigate to the folder location to select the statement file you exported above.
- If you need to exclude certain patients, click here to see how you can upload an Exclusion List.
- Click Upload files and start job
- You’re done! Our team will be automatically notified of you new upload.
🚫 Exclusion list: if you want to exclude certain patients from being mailed/emailed (even though they appear in your billing file), do the following:
- download this Excel Exclusion List for FrameworkLTC,
- enter the patient ID's into the Exclusion List that we should not mail/email (i.e. ignore), and then
- upload the Exclusion list, along with your Patient Statement file each month. You will see an extra "Choose file" buttons.
Auto-posting of payments: To automatically post payments received online into Sage/Framework, please follow these steps: Auto-post Payments into your Practice Software.
🏥 Agency (Facility) Billing: to send multiple patient invoices in one envelope (or email) to an Agency (Facility), learn more here.
Liberty Software
One-time setup before the first mailing
- Setup Patient IDs
- If patient ID’s do not already appear on your patient statements, ask Liberty support (800) 480-9603 to turn on patient ID’s in Liberty.
- This will automatically assign patient ID’s to new accounts.
- For old accounts, you will need to assign a patient ID manually.
- Patient ID’s are required to work with AR Proactive.
- Setup VFI Statements
- Go to Liberty > System > Interfaces > VFI Statements

- On the VFI Export popup > Settings
- Check the box Enable FTP file transfer
- Enter URL: 159.203.122.169
- Username: ask AR Proactive support. Password: ask AR Proactive support (ARP internal how-to is here)

- Go to Liberty > System > Interfaces > VFI Statements
Every 1st of the month (or whenever you’re ready to mail patient statements)
- Go to Liberty > System > Interfaces > VFI Statements (see screenshot above)
- On the VFI Export popup > Export > Ok
- Your statement file will be automatically sent to us (via FTP) for mailing. You're done!

Note:
- AR Proactive can send out invoices only to patients, for pharmacies that use Liberty Software.
- We cannot send invoices and reminder letters to patients. This is due to a known limitation in the way that Liberty Software exports their patient statement files.
Pioneer 
Step 1. Run the Statements report
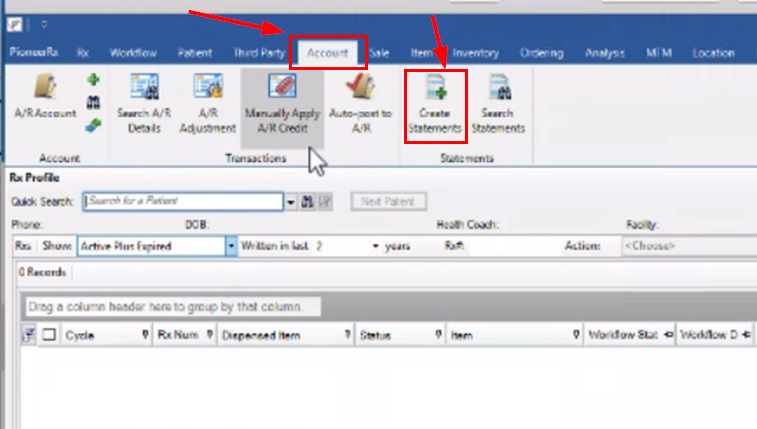
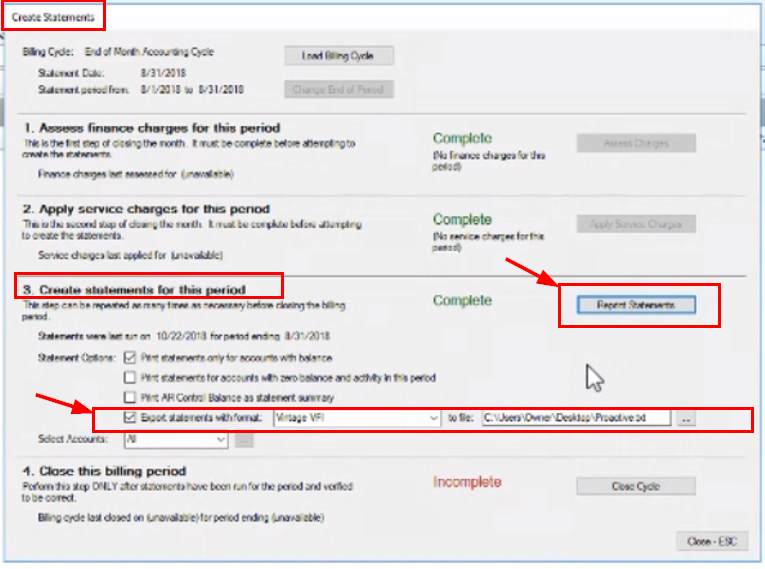
- Go to Account > Create Statements
- Check Export statements with format in “3. Create statements for this period”
- Select Vintage VFI in the file format dropdown
- Select the file location to save the file with the 3 dots. Select Desktop or somewhere you can find the file.
- Click (Re)print statements. This will save a file to your chosen folder.
Step 2. Upload to AR Proactive
- Go to ARproactive.com > Login > Patient Billing > Uploads > click Create a job
- Click Choose File, and navigate to the folder location.
- Click Upload files and start job
- You’re done! An automatic email will tell our team you uploaded a new file.
🚫 Exclusion list: if you want to exclude certain patients from being mailed/emailed (even though they appear in your statement file), do the following:
- download this Excel Exclusion List for PioneerRx,
- enter the Patient ID's into the Exclusion List that we should not mail (i.e. ignore), and
- upload the Exclusion list, along with your Statement file. You will see 2 "Choose file" buttons.
PointClickCare
Step 1. Generate bills in PCC for each facility
- Login to PointClickCare.com
- Open the Facility for which you want to complete billing
- Go to Admin > Billing
- Click Statements: Generate > select statements you want to send > click Generate
- Be sure to include Bills for residents that have a $0.00 balance. This is so that we can mark them as "Paid" on the patient portal. We will not send them a bill.

- Be sure to include Bills for residents that have a $0.00 balance. This is so that we can mark them as "Paid" on the patient portal. We will not send them a bill.
- Click Statements: Trials > select statements > click Real Bill
- You're done!
Next:
- our system will automatically fetch the bills waiting to be sent under Statements: Export.
- It will send the bills out to the responsible parties.
- No further action is needed from you.
How the PCC statement data comes into AR Proactive
🙍Resident ID Number: we combine PCC's Facility ID, Resident ID and Guarantor ID to make a unique account number in AR Proactive.
- For example, if the
- Facility ID is
F101, and - Resident ID is
R101, and - Guarantor ID is
G101, - then the resident ID number in AR Proactive will be
F101-R101-G101.
- Facility ID is
- By default, a separate invoice will be sent to each guarantor if there is a valid mailing address or email address on file. You can turn off (or update) the delivery preference for each account number.
📃Invoice number: we combine PCC's Invoice ID and and Guarantor ID to make a unique invoice number in AR Proactive.
- For example, if the
- Invoice number is
1234, and - Guarantor ID is
G101, - then the invoice number in AR Proactive will be
1234-G101.
- Invoice number is
Rx30
One-time setup before the first mailing
- Turn on patient statement export inside Rx30 for charge accounts
- Go to Rx 30 > F1 > PO > 5. Vendors
- Add a new record in Vendor Record Maintenance with these values (see snip below):
- Name: AR Proactive
- Address: 2821 W Estes Ave, Chicago, IL 60645
- Phone: (773) 669-7989
- Account (username): Contact us to request "an Rx30 FTP login"
- Password: Ar@ftp11
- FTL-URL: 159.203.122.169
- Submit code: A
- All other fields can stay as the default.
- Press F4 Save

- Associate each billing cycle with AR Proactive vendor
- Go to AR > “04 Billing Cycle Maintenance”
- Choose each Cycle Code that will be mailed by AR Proactive
- Change the “Statement Form” dropdown from “Plain paper statement” to “AR PROACTIVE” (if this option is not available, choose the default “VFI Statement File”, or “!AR_VFI”)
- Press F4 Save
- If you have multiple Billing Cycles, select each Cycle Code, and associate the "Statement Form" like in the previous step.

Every 1st of the month (or whenever you’re ready to mail patient statements)
-
Note: send us the VFI patient statements before closing/compressing the month.
-
If this is not done correctly, and the VFI file is generated after closing the month, then the file will not show line items, only a "Previous balance".
- Go to Rx30 > “08 Statement”
- Choose Billing cycle
- Click F5 Print. Wait while Rx30 prepares the file. (It’ll say “STATEMENT PRINT IN PROGRESS” at the top right.)
- A popup appears asking “Submit VFI statement now via FTP?” select Y (yes)
- Wait a few minutes.
- When the screen refreshes choose Vendor: AR PROACTIVE (see snip below)

- Click “F4 Begin” (at the very bottom of the screen) and the file will be transferred (via FTP) to our servers. After a while, you will see “FTP Process Complete” (at the bottom right).

- Email support@arproactive.com to let us know you’ve uploaded a file, so we can process it. (This is needed the first time you upload, to make sure everything worked.)
- You did it! Our team will process your file.
🚫 Exclusion list: if you want to exclude certain patients from being mailed/emailed (even though they appear in your statement file), do the following:
- download this Excel Exclusion List for SuiteRx,
- enter the Patient ID's into the Exclusion List that we should not mail (i.e. ignore), and
- upload the Exclusion list, along with your Statement file. You will see 2 "Choose file" buttons.
QS/1 Primecare
Step 1. Run the Statements report
Note: run the patient statements before closing/compressing the month.
- Open QS/1 PrimeCare > A/R > Statements > VFI Statements
- select group code (if applicable) > Next > Next
- select Print option > populate statement date and pay by date, “in care of” is optional
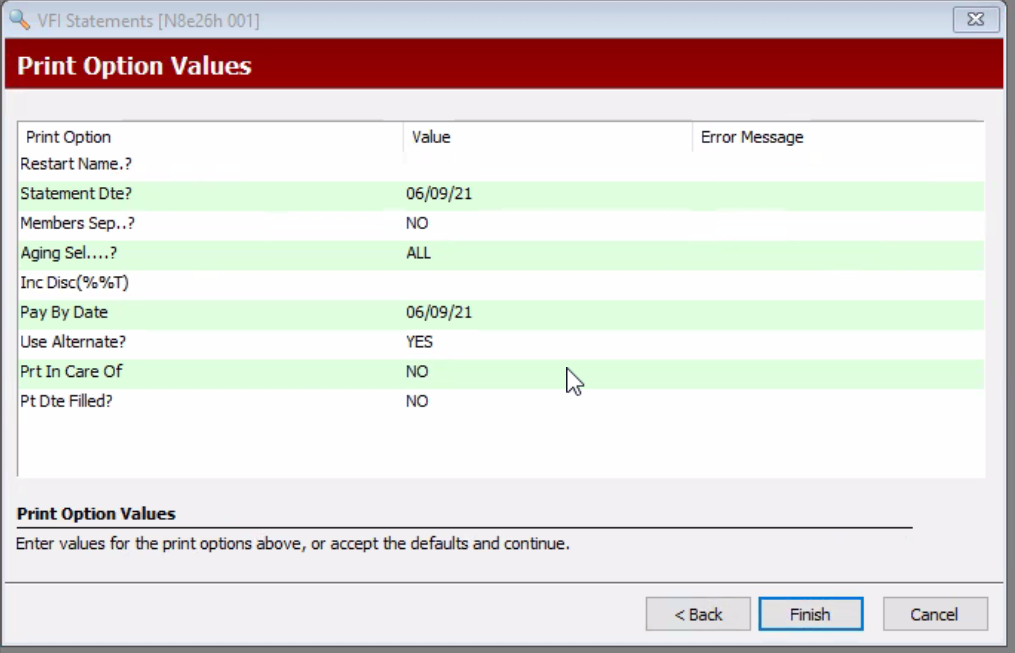
- Do not “Age and Reset accounts” until after you’ve successfully uploaded the file to AR Proactive and the statements were mailed out.

- Finish > Next (it’s optional to enter “A/R Alternate Store Information”)
- if you’re on a workstation (typical) click “Write to secondary” which defaults to C:\QS1 or select a folder
- click Export

If you get the following popup, you may need to select a different folder location, or you can try clicking “Ok”
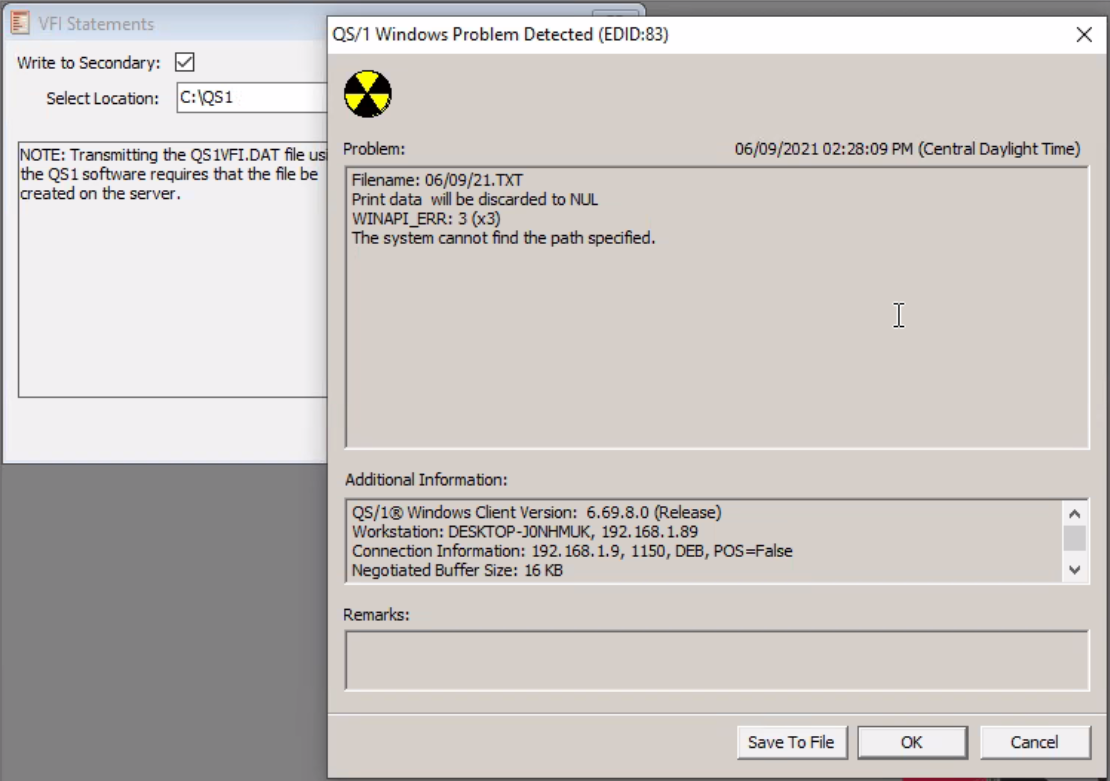
The file is saved in the folder you select, with the name “QS1VFI.DAT”, or similar. (You may need to rename the file from “QS1VFI.DAT” to “QS1VFIDAT” so that the file format is correct.)
Step 2. Upload files to AR Proactive
- Go to ARproactive.com > Login > Patient Billing > Uploads > Create a job
- Click Choose File, and navigate to the folder location. (In Chrome you can drag and drop the file onto the Choose File button).
- Click Upload files and start job
- You did it! An automatic email will tell our team you uploaded a new file.
💲 Auto-posting of payments: To automatically post payments received online into QS1, please follow these steps: Auto-post Payments into your Practice Software.
🚫 Exclusion list: if you want to exclude certain patients from being mailed/emailed (even though they appear in your statement file), do the following:
- download this Excel Exclusion List for QS/1,
- enter the Patient ID's into the Exclusion List that we should not mail (i.e. ignore), and
- upload the Exclusion list, along with your Statement file. You will see 2 "Choose file" buttons.
🏥 Agency (Facility) Billing: to send multiple patient invoices in one envelope (or email) to an Agency (Facility), learn more here.
SuiteRx
Step 1. Run the Statements report
- Open SuiteRx
- Click Reports > Statement
- Select the dates and parameters you usually choose
- Click Ok

- Wait for the Account Statement report appears on screen, like this:

- Click Action > Export to...

- In the popup window select the following:
- Format: select CSV with header
- Path: click Browse to select a folder where the exported file will be saved, that you can find later
- Click Export. The .csv file be saved to the selected folder.

Step 2. Upload files to AR Proactive
- Go to ARproactive.com > Login > Patient Billing > Uploads > Create a job
- Click Choose File, and navigate to the folder location to select the file you exported from SuiteRx above.
- If you need to exclude certain patients, click here to see how you can upload an Exclusion List.
- Click Upload files and start job
- You did it! An automatic email will tell our team you uploaded a new file.
❓ How to Read the SuiteRx .csv statement file
🙍Find a patient: the patient's account number appears in column AR ("account_number"). (It does not appear in column B "account_id" which is for internal use by SuiteRx only).
💵 Calculate a patient's balance from the .csv statement file you export from SuiteRx:
-
- Patient balance =
- "opening_balance" (col E) if "row_flag" (col A) is equal to "A"
- + (plus) "patient_pay" (col M) (all items for this patients)
- - (minus) "patient_paid" (col N) if "row_flag" (col A) is not equal to "C"
(There is no "PatientBalance" column in the SuiteRx statement file, so that's why we calculate it.)
-
- "opening_balance" (col. E): the patient's previous balance
- "patient_pay" (col. M): the patient's current charges for the time range selected
- "patient_paid" (col. N): payments received
- "row_flag" (col. A): this is a code used by SuiteRx that tells you what type of data is in each row in the file:
- A = account info, like previous balance.
- C = charge.
- D = deposit, payment.
- E = adjustment or error (see col AL and AD for a description)
- F = credit, charge reversal or free (see col AL and AD for a description)
- Use this Excel sheet to calculate your patient balances from your SuiteRx statement file. (You this sheet as a "helper-file" for trouble-shooting.)
🚫 Exclusion list: if you want to exclude certain patients from being mailed/emailed (even though they appear in your statement file), do the following:
- download this Excel Exclusion List for SuiteRx,
- enter the Patient ID's into the Exclusion List that we should not mail (i.e. ignore), and
- upload the Exclusion list, along with your Statement file. You will see 2 "Choose file" buttons.